Technical Project Notes
Technical Blog
Technical project notes, build records, deployment details, diagrams, and practical code examples.
- Posts
- 7
- Latest
- 23 August 2026
Latest Post
Displaying Photographs on a Six-Colour E-Paper Screen
Comparing dithering, ordered screening, and AM and FM raster techniques on a 600×400 Waveshare Spectra 6 display driven by a Raspberry Pi 4B.
Full-colour e-paper is an appealing target for information displays. It is reflective, remains visible without a backlight, and retains its last image after power is removed. Those advantages come with a very different set of constraints from an LCD. A refresh is slow, partial updates are not available on this panel, and every pixel must be one of only six physical colours.
This experiment uses the following display and host configuration:
| Specification | Value |
|---|---|
| Display | Waveshare 4-inch e-Paper HAT+ (E) |
| E-paper technology | E Ink Spectra 6 |
| Resolution | 600 × 400 square pixels |
| Active area | 84.6 × 56.4 mm |
| Aspect ratio | 3:2 |
| Physical palette | Black, white, yellow, red, blue, and green |
| Full refresh | Approximately 19 seconds |
| Partial refresh | Not supported |
| Interface | SPI |
| Host | Raspberry Pi 4B |
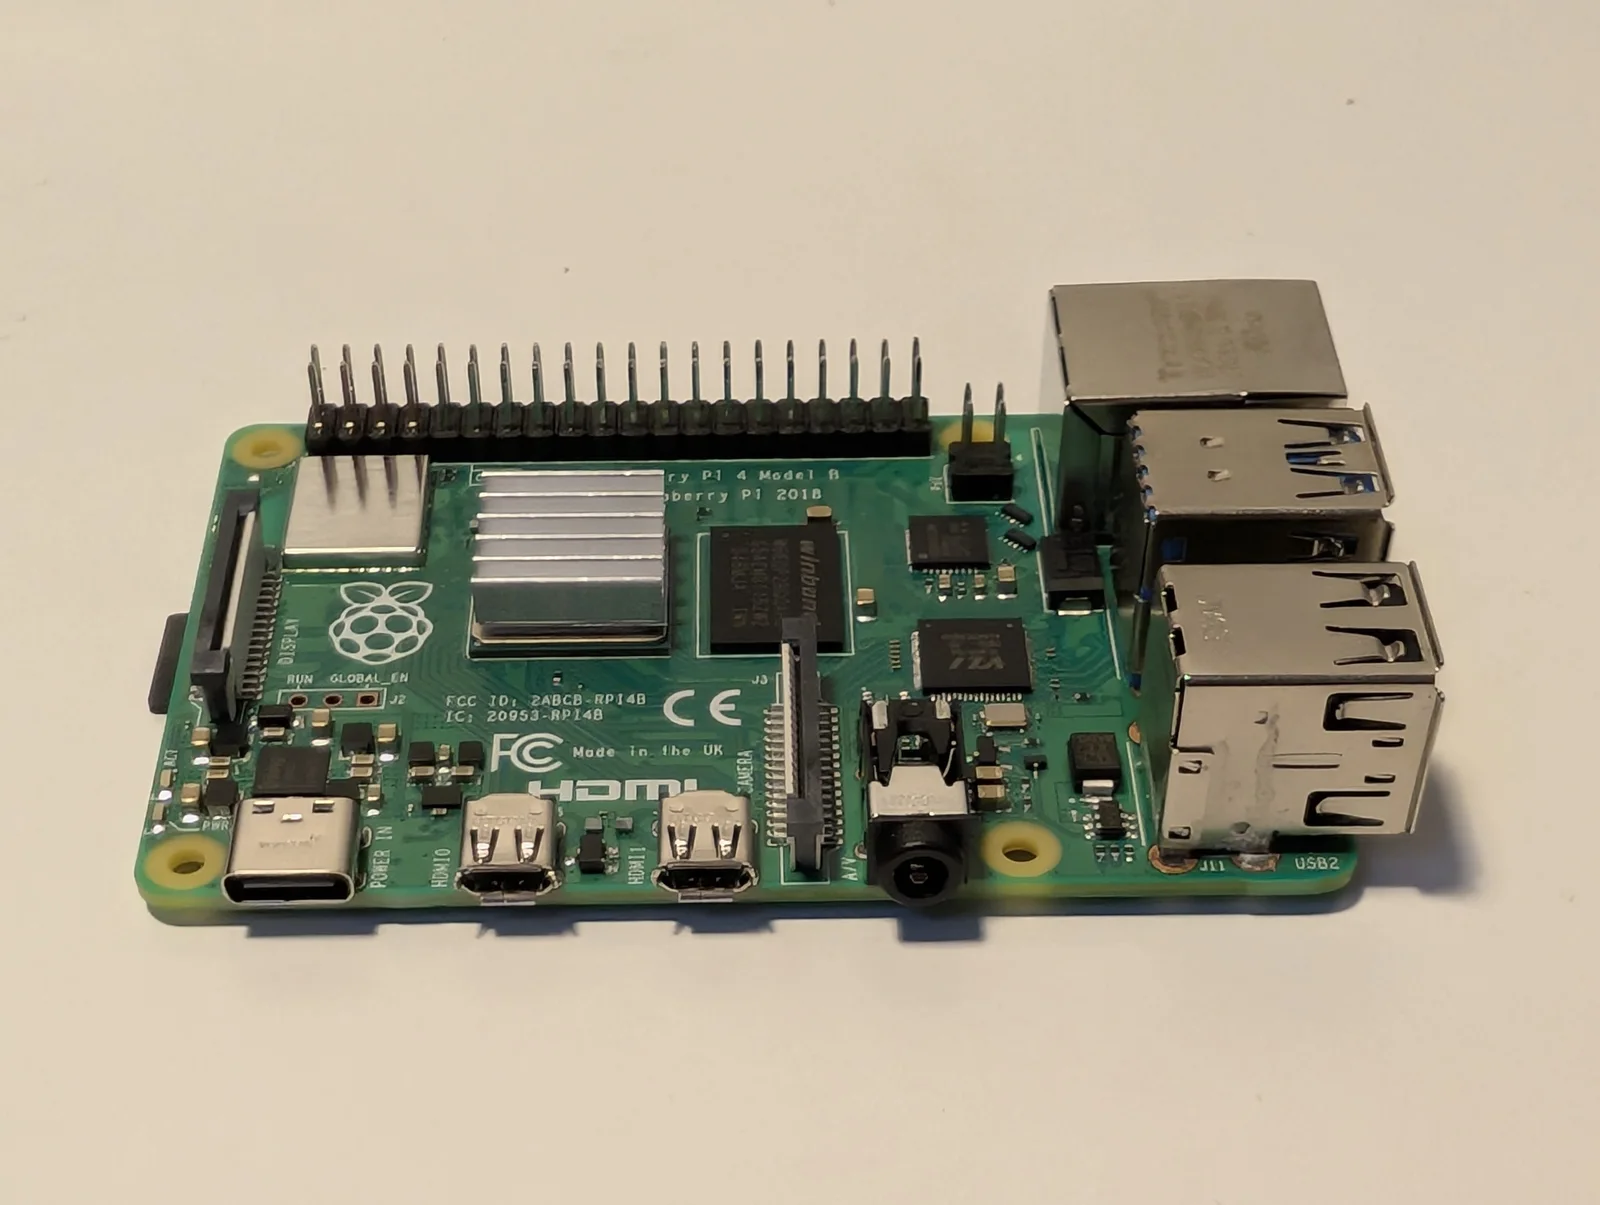
The Raspberry Pi 4B shown below prepares each image and sends the packed six-colour frame to the display over SPI.
Six Colours Are Enough for an Interface
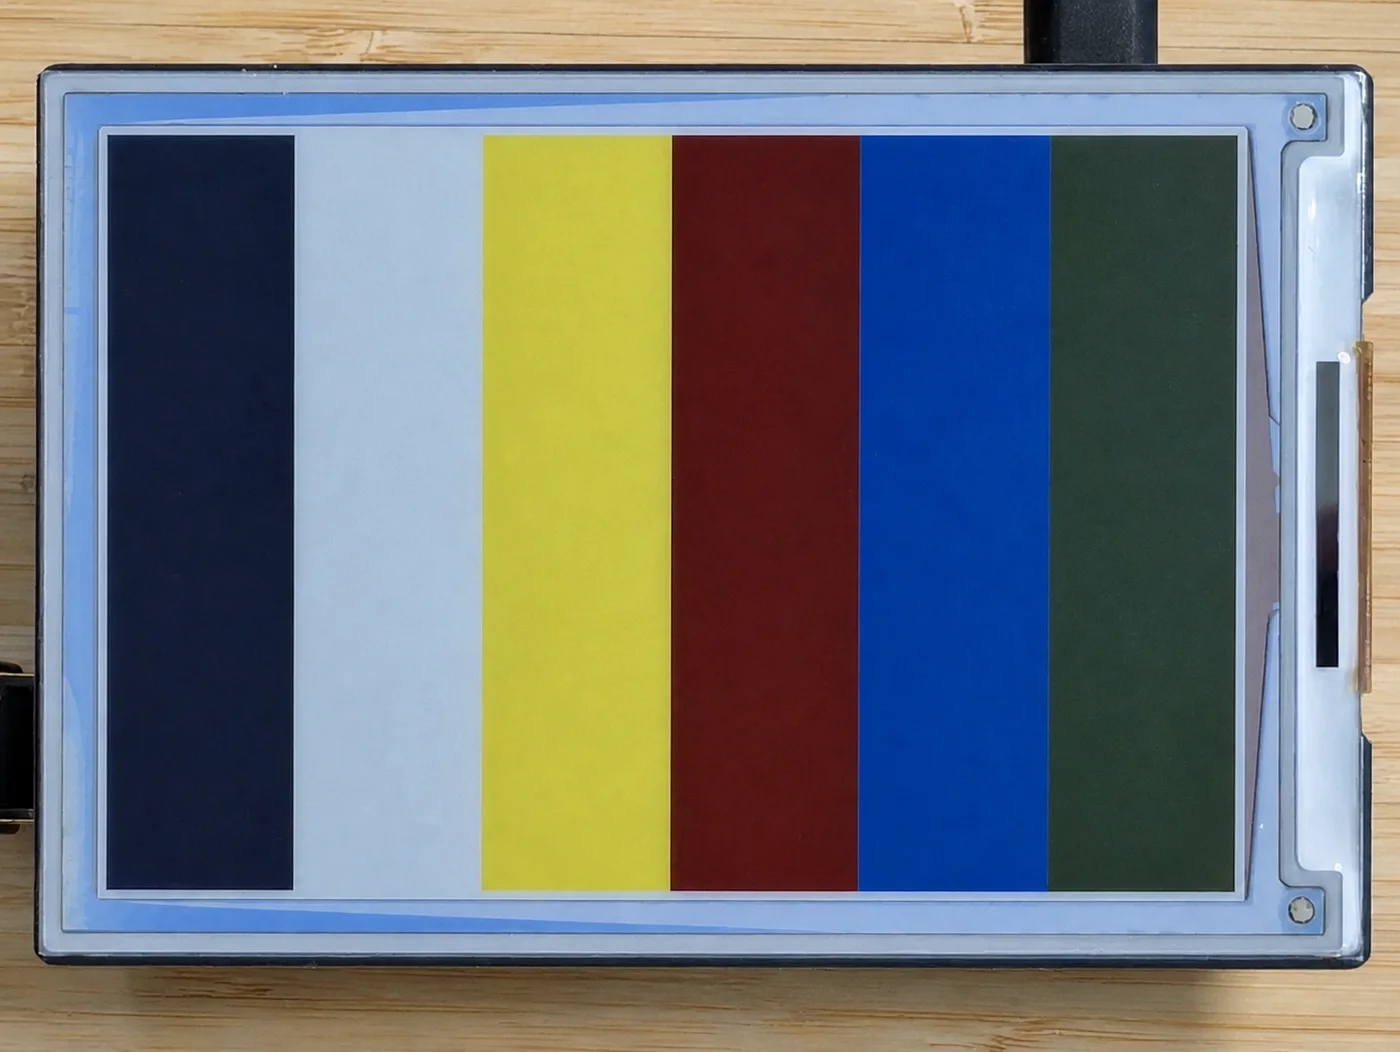
The controller palette is black, white, yellow, red, blue, and green. These are discrete physical states rather than a conventional RGB colour space. There is no darker yellow or paler blue available at a single pixel.
That is not a serious limitation for the display's usual applications. A dashboard, price label, sign, or status panel can be designed with solid areas, high contrast, and typography that uses the palette directly. In that situation the renderer does not need to invent colours that the panel cannot produce.
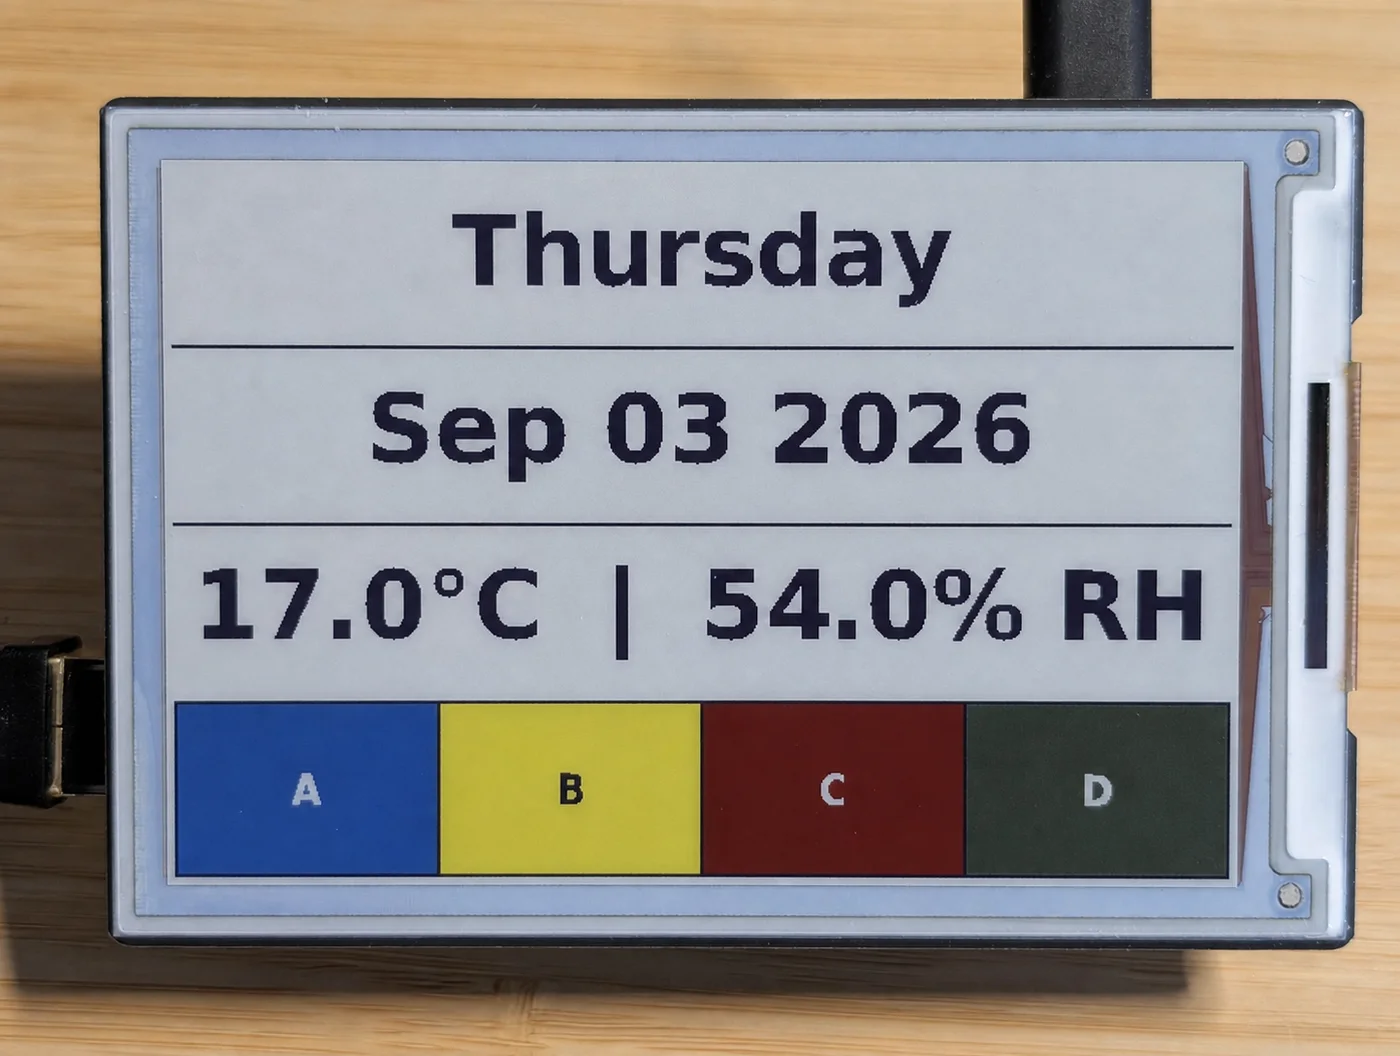
The dashboard above is a representative use case. Text, rules, and four coloured blocks are drawn directly in the physical palette, so the result is sharp and predictable. The question here is deliberately less comfortable: what is the best way to show a photograph when every source colour has to become one of six inks?
Turning Tone into Pattern
A black-to-white gradient is a useful first test because it removes subject matter and exposes the structure of each method. With two colours, the output cannot contain a physical grey pixel. Any apparent grey must be created by arranging black and white pixels so that the eye averages them at normal viewing distance.

This is the unprocessed source: a continuous linear transition from white to black with no dithering, raster, or palette reduction. It is the target that the following photographs attempt to reproduce using the panel's discrete physical colours.
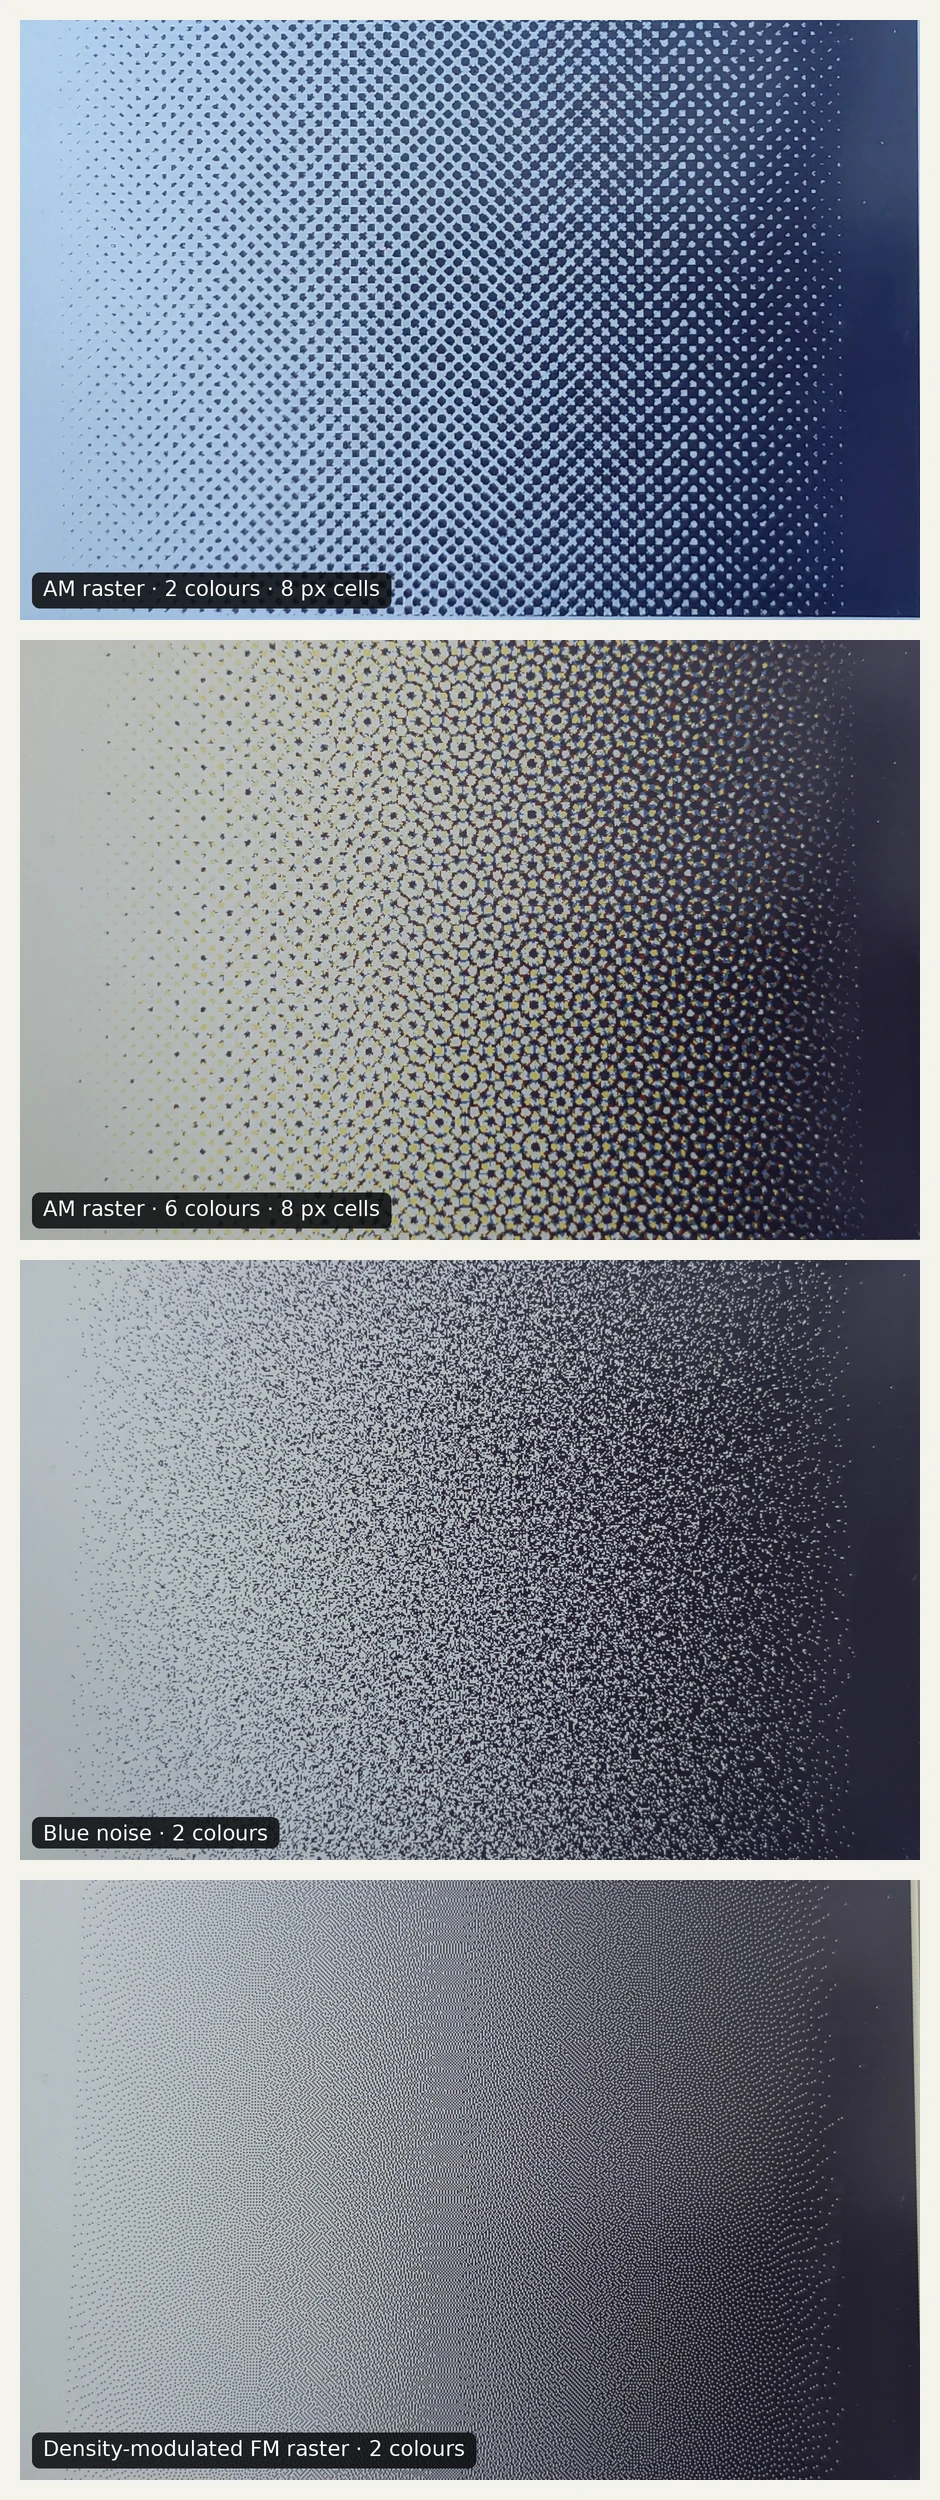
The two-colour AM raster is visually similar to a traditional halftone: dots grow as the requested tone becomes darker. The six-colour AM version has more possible spatial combinations. Even on a nominally grey source, coloured marks can contribute intermediate perceived brightness, so the transition appears richer, although it also acquires colour casts.
Blue noise replaces the obvious dot grid with a finely scattered texture. Density-modulated FM uses one-pixel marks and distributes quantisation error into neighbouring pixels; its gradient looks finer and more continuous, but the pattern still becomes visible at close range.
Nearest-colour mapping is intentionally absent from this gradient comparison. With only black and white enabled it cannot synthesize grey: values on one side of the midpoint become white, values on the other become black, and the smooth ramp collapses into a hard division. This is the simplest demonstration of why a photo renderer needs a spatial technique.
The Available Photo Techniques
All of the methods solve the same problem—choosing physical palette colours—but they decide where to place the resulting error in different ways.
Nearest colour
Each input pixel is replaced independently by the closest enabled physical colour. It is fast, deterministic, and keeps hard edges crisp. It cannot represent intermediate tone, so photographs become posterised and smooth gradients become bands or hard transitions.
Floyd–Steinberg error diffusion
The renderer selects the nearest palette colour, measures the RGB error, and shares that error with nearby pixels using the classic 7/16, 3/16, 5/16, and 1/16 weights. Local errors are turned into a fine texture while average colour is retained over a larger area. The method is a dependable default, although its left-to-right scan can create directional or worm-like structures.
Serpentine Floyd–Steinberg
The same error-diffusion kernel is used, but alternate rows are processed in opposite directions. Reversing the scan reduces the directional bias of standard Floyd–Steinberg while preserving its tone and detail.
Ordered Bayer
An 8 × 8 threshold matrix is repeated across the image. Each pixel is offset by the matrix value before being mapped to the palette. The pattern is regular and therefore visible, but it is stable, fast, sharp, and free from accumulated error. On the physical e-paper panel, this regularity is less distracting than it appears in a magnified photograph.
Blue noise
A deterministic, spatially balanced threshold order avoids the strong low-frequency structures of a regular screen. The texture is evenly scattered, but the price is visible grain and lower apparent sharpness, particularly in smooth backgrounds.
AM raster
Amplitude modulation uses a fixed screen of round dots. The cell spacing remains constant while dot area changes with tone. It has a recognisable printed-halftone appearance. Cell size can be adjusted from 2 to 64 pixels, but large cells consume detail quickly on a 600 × 400 display. The four-pixel screen used in the photo test is already clearly visible.
Density-modulated FM raster
The dot size remains one pixel while the number and placement of dots changes with tone. This implementation uses error diffusion to control local density. At display resolution it can resemble Floyd–Steinberg, but conceptually it is a frequency-modulated raster: tone is represented by how many fixed-size marks appear in an area.
Stochastic FM raster
This second FM implementation compares each one-pixel position with a seeded pseudo-random threshold. Dot probability follows the requested tone without an error-diffusion kernel. The fixed seed makes repeated renders identical, while the genuinely stochastic placement produces more clumping and noise than the density-modulated version.
The E-Paper Driver
The renderer is a single-purpose C++ program called waveshare_epaper_display. It accepts JPEG and PNG images from either an HTTP/HTTPS URL or the local filesystem. Transparent PNG pixels are composited over white, and the source is scaled to fit 600 × 400 without changing its aspect ratio. Any unused area is white.
The complete standalone C++ driver, build instructions, photo methods, and hardware-independent tests are available in the [waveshare_epaper_display repository on GitHub](https://github.com/lonezor/waveshare_epaper_display).
Photo output can use two through six colours. Colours are enabled in controller order—black, white, yellow, red, blue, and green—so a two-colour experiment is genuinely black and white, while six colours uses the complete panel palette. --method selects the algorithm and --am-cell-size controls the AM screen. --list-method prints every available method and exits even if other options have been supplied.
./waveshare_epaper_display --list-method

./waveshare_epaper_display \
  --path /home/images/kodim23.png \
  --colors 6 \
  --method ordered-bayer

./waveshare_epaper_display \
  --url https://r0k.us/graphics/kodak/kodak/kodim23.png \
  --colors 6 \
  --method density-fm-raster

./waveshare_epaper_display \
  --path /home/images/gradient.png \
  --colors 2 \
  --method am-raster \
  --am-cell-size 8
The same photo methods are also available in the Pixel Sorter program for interactive experiments. Separate --palette and dashboard modes bypass photo conversion and write exact controller colour codes.
After rendering, the driver packs two four-bit colour codes into each byte, opens SPI and the required GPIO lines through lgpio, performs one complete refresh, puts the panel into sleep mode, and switches off HAT power. The image remains on the electrophoretic panel without continuous power.
Evaluation on the Physical Display
The results in this article are evaluated primarily by viewing the physical Spectra 6 panel at normal viewing distance, not by comparing rendered pixels on a conventional full-colour monitor. Software previews and enlarged crops are useful for aligning images and exposing pattern structure, but they are only diagnostic aids. An RGB display cannot reproduce the e-paper panel's six pigment colours, reflectivity, pixel boundaries, optical mixing, or the way a raster appears at its actual four-inch size.
The physical panel is therefore the final output and the basis for the qualitative rankings below. A method that looks mathematically cleaner or more sophisticated in a software preview can still appear noisier, softer, or less natural once rendered by the real display. Conversely, a visible ordered structure in a magnified preview may blend into a sharp and convincing photograph on the panel.
A Reference Photograph: Kodak Image 23
The photographic test uses kodim23, the parrot image from the Kodak Lossless True Color Image Suite. The suite contains 24 lossless 768 × 512 photographs and is widely used in image-compression and image-processing research because every method can be tested against the same uncompressed sources.
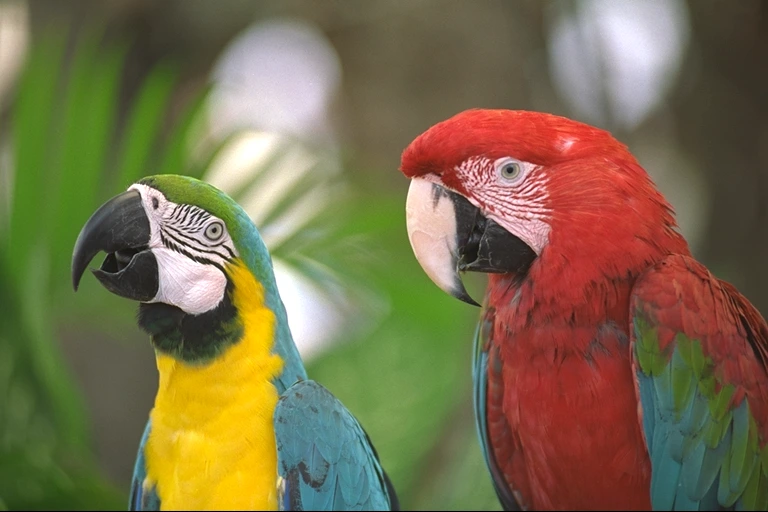
This image is particularly useful for a six-colour display. It contains saturated yellow, blue, green, and red; black and pale facial markings; fine lines around the eyes and beaks; feather texture; and a softly focused background. A method has to preserve both hard detail and gradual colour changes after the image is reduced to exactly 600 × 400 pixels and six physical colours.
Results: Coarse and Noisy Approaches
The first group contains methods that are useful as references but are less likely to become the everyday photo mode.
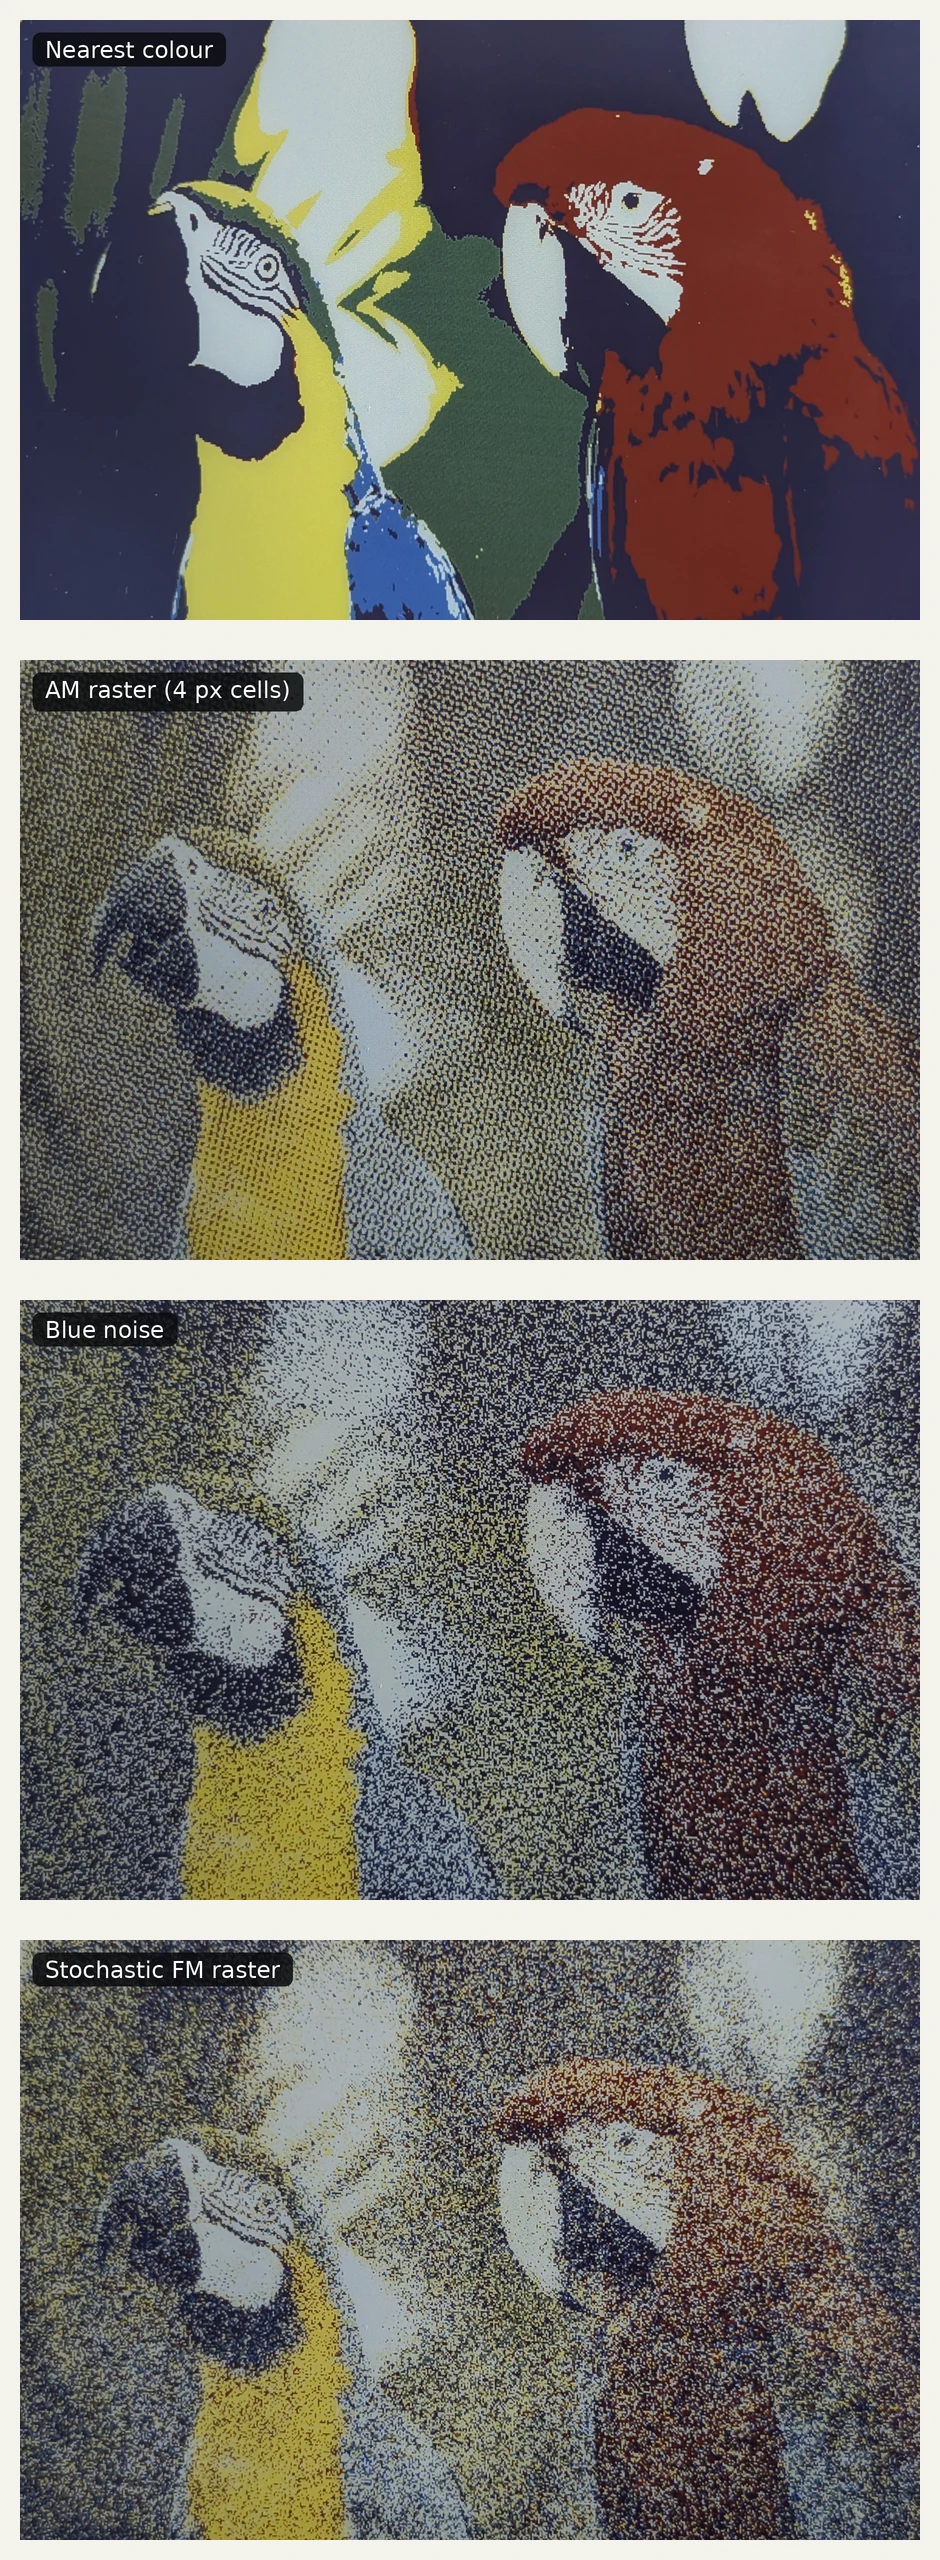
Nearest colour produces the cleanest boundaries but discards most shading. It resembles a deliberately posterised illustration rather than a photograph. AM raster preserves broad tone, but the fixed four-pixel cells dominate feather and facial detail. Blue noise and stochastic FM both preserve more average colour, although their scattered marks reduce apparent sharpness. Stochastic FM is the least even because independent random decisions naturally form small clusters.
The aligned close-up makes those differences much easier to see:
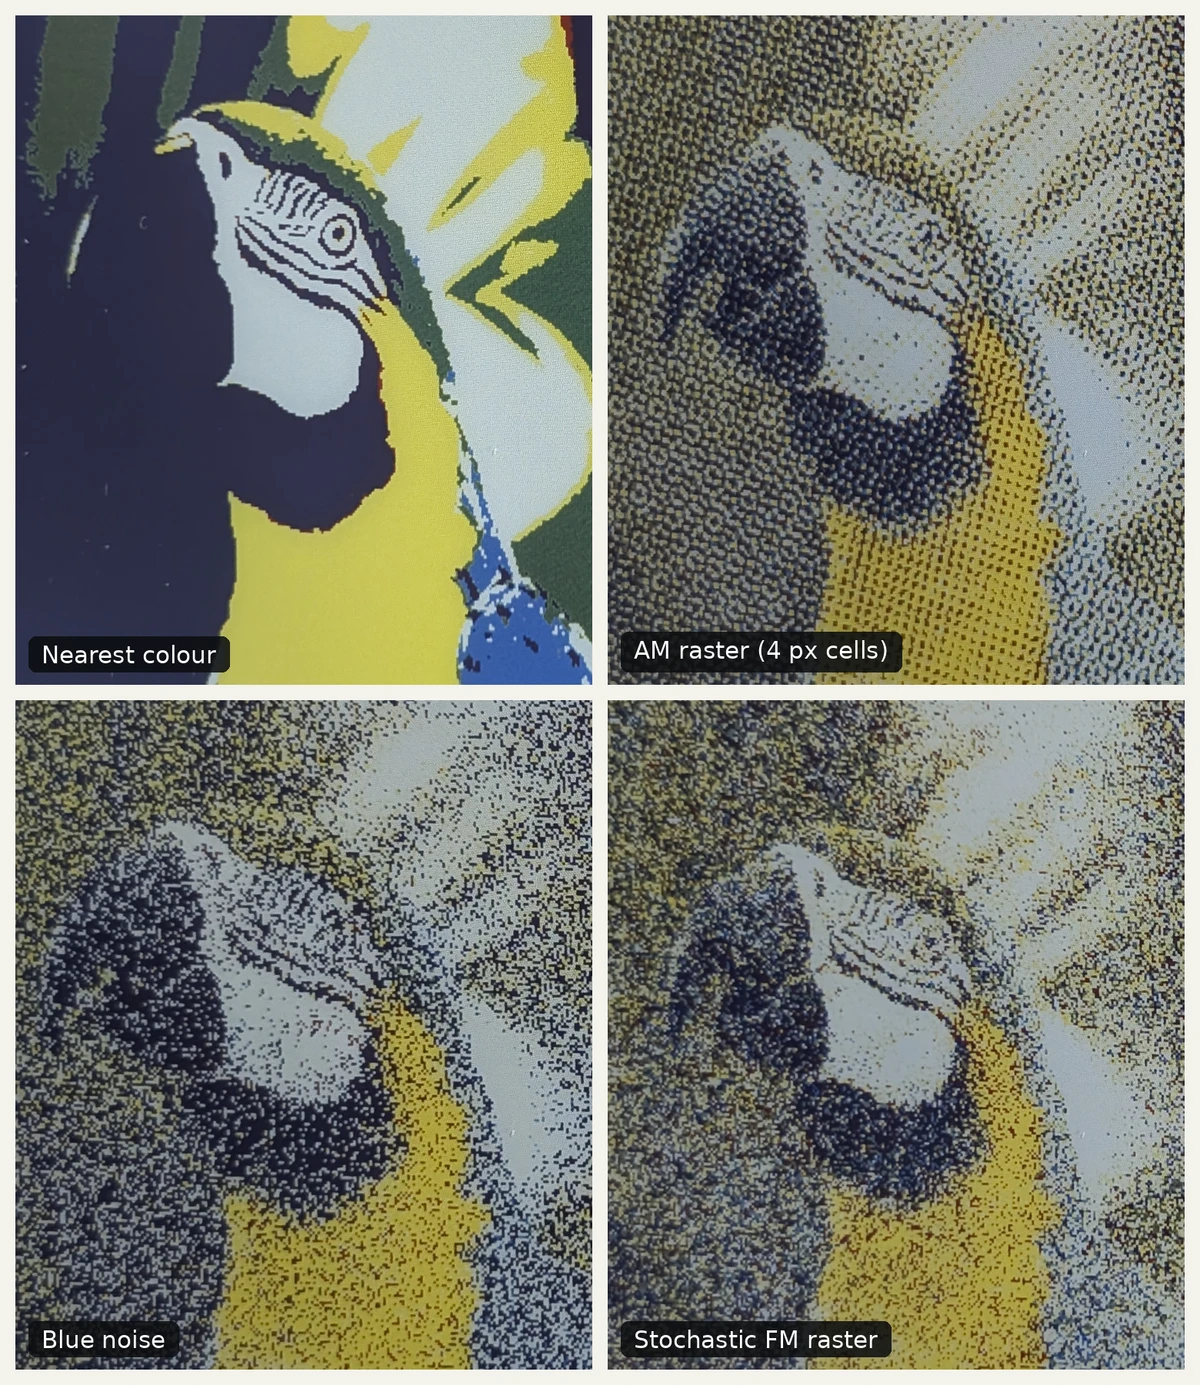
The eye and facial lines remain very clear with nearest colour, but intermediate facial tones disappear. AM converts those tones into large repeating dots. Blue noise creates a more balanced but conspicuous grain, while stochastic FM has a looser random texture.
Results: The Practical Candidates
The second group contains the techniques that produced the most useful photographic results on the panel.
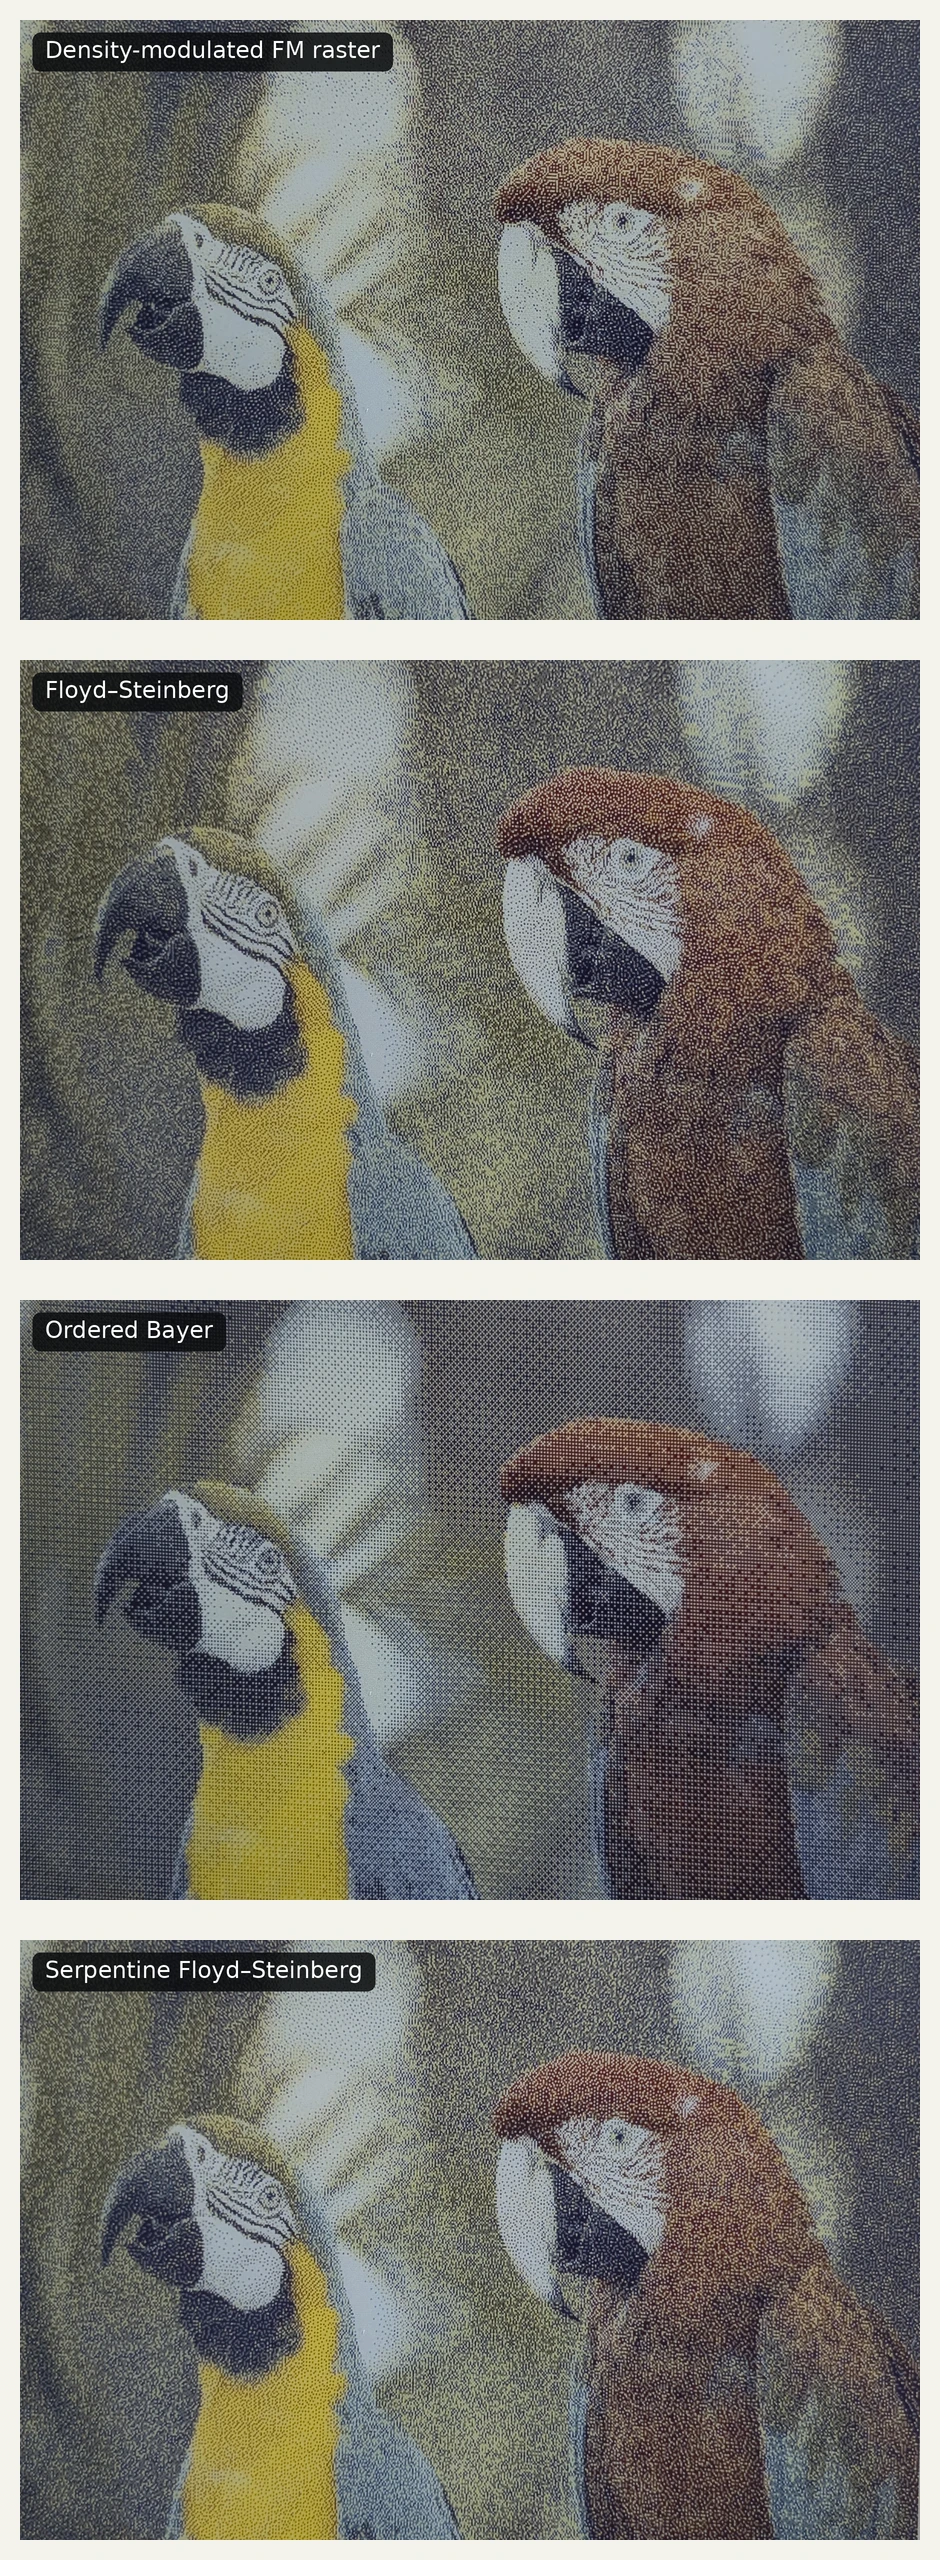
Density-modulated FM, Floyd–Steinberg, and serpentine Floyd–Steinberg are close relatives visually. All three use many small marks to maintain local averages, and all retain substantially more photographic tone than nearest colour. Serpentine scanning reduces the directional character of standard Floyd–Steinberg, but at normal viewing distance the two are very similar.
Ordered Bayer is the surprise. A magnified view exposes its repeating 8 × 8 structure, yet on the actual four-inch panel it looks sharp, stable, and less noisy than the irregular methods. The periodic texture is predictable and does not create the same wandering error patterns in smooth areas.
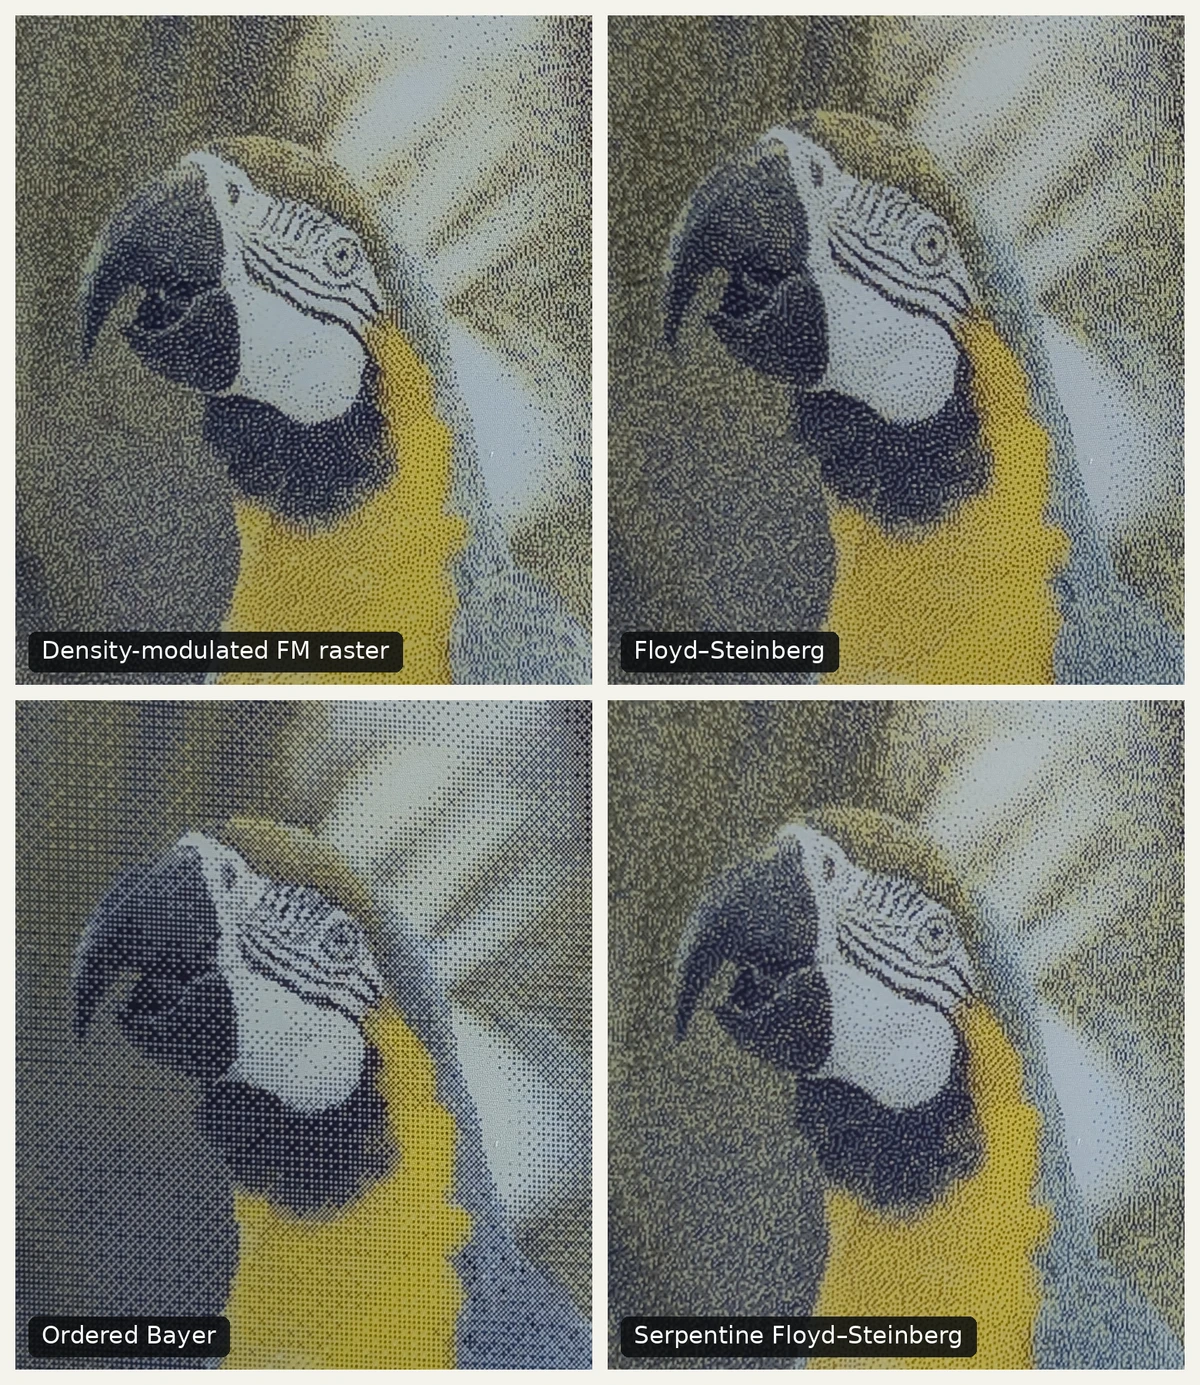
The yellow parrot's eye and the tongue inside its open beak are the most revealing areas. Ordered Bayer retains the eye's edge geometry and thin facial lines with a uniform screen. Floyd–Steinberg and its serpentine variant make the same region look more organic, but fine error-diffusion patterns soften some edges. The tongue makes the distinction between Floyd–Steinberg and density-modulated FM especially clear: density-modulated FM gives the small feature a compact, comparatively continuous boundary, while Floyd–Steinberg reconstructs its outline and internal tone with a looser, more irregular error-diffusion texture. Density-modulated FM is similarly detailed overall and provides an attractive fine-raster alternative.
Which Method Works Best?
There is no universally correct conversion because the visible texture is part of the result. These rankings are deliberately device-specific and reflect the physical screen rather than pixel-level scoring on a full-colour monitor. For general photographs on this particular panel, Ordered Bayer currently gives the best subjective balance of sharpness, tonal range, predictable output, and low visual noise. Floyd–Steinberg remains a strong general default, and serpentine Floyd–Steinberg is preferable when directional error patterns become visible. Density-modulated FM is competitive when a fine print-like texture is wanted.
AM raster is valuable as a stylistic option rather than a neutral renderer. Its dots can be made smaller, but a single-pixel AM screen is no longer a meaningful variable-area dot; at that scale the method converges towards pixel-level thresholding. Blue noise and stochastic FM are technically interesting, but their deliberately irregular structure looks softer and noisier on this small display.
Step Back from the Pixels
Image-processing comparisons naturally lead towards a deep examination of pixels. Enlarged crops are useful because they expose dot structure, directional artefacts, misplaced colour, and lost detail. They can also make us lose perspective. Put an optimal RGB original beside a magnified six-colour result and it is easy to conclude too quickly that the e-paper version does not work.
That comparison quietly assumes that both displays are intended to do the same job. They are not. Judging reflective e-paper only by the standards of a bright RGB monitor is rather like judging a tractor as if it were a sports car: the sports car is faster, but that says little about which machine is useful in a field. A conventional display can reproduce a far better photograph, but it needs power to emit or modulate light and to keep showing it. This panel can finish a refresh, switch its HAT power off, and retain the image.
The viewing distance matters just as much. A four-inch information display is not normally used with the viewer's face close enough to resolve individual pixels. It is seen as a small physical object on a desk, shelf, wall, or instrument. From that distance the marks combine, the raster becomes texture, and the subject becomes more important than the conversion method.
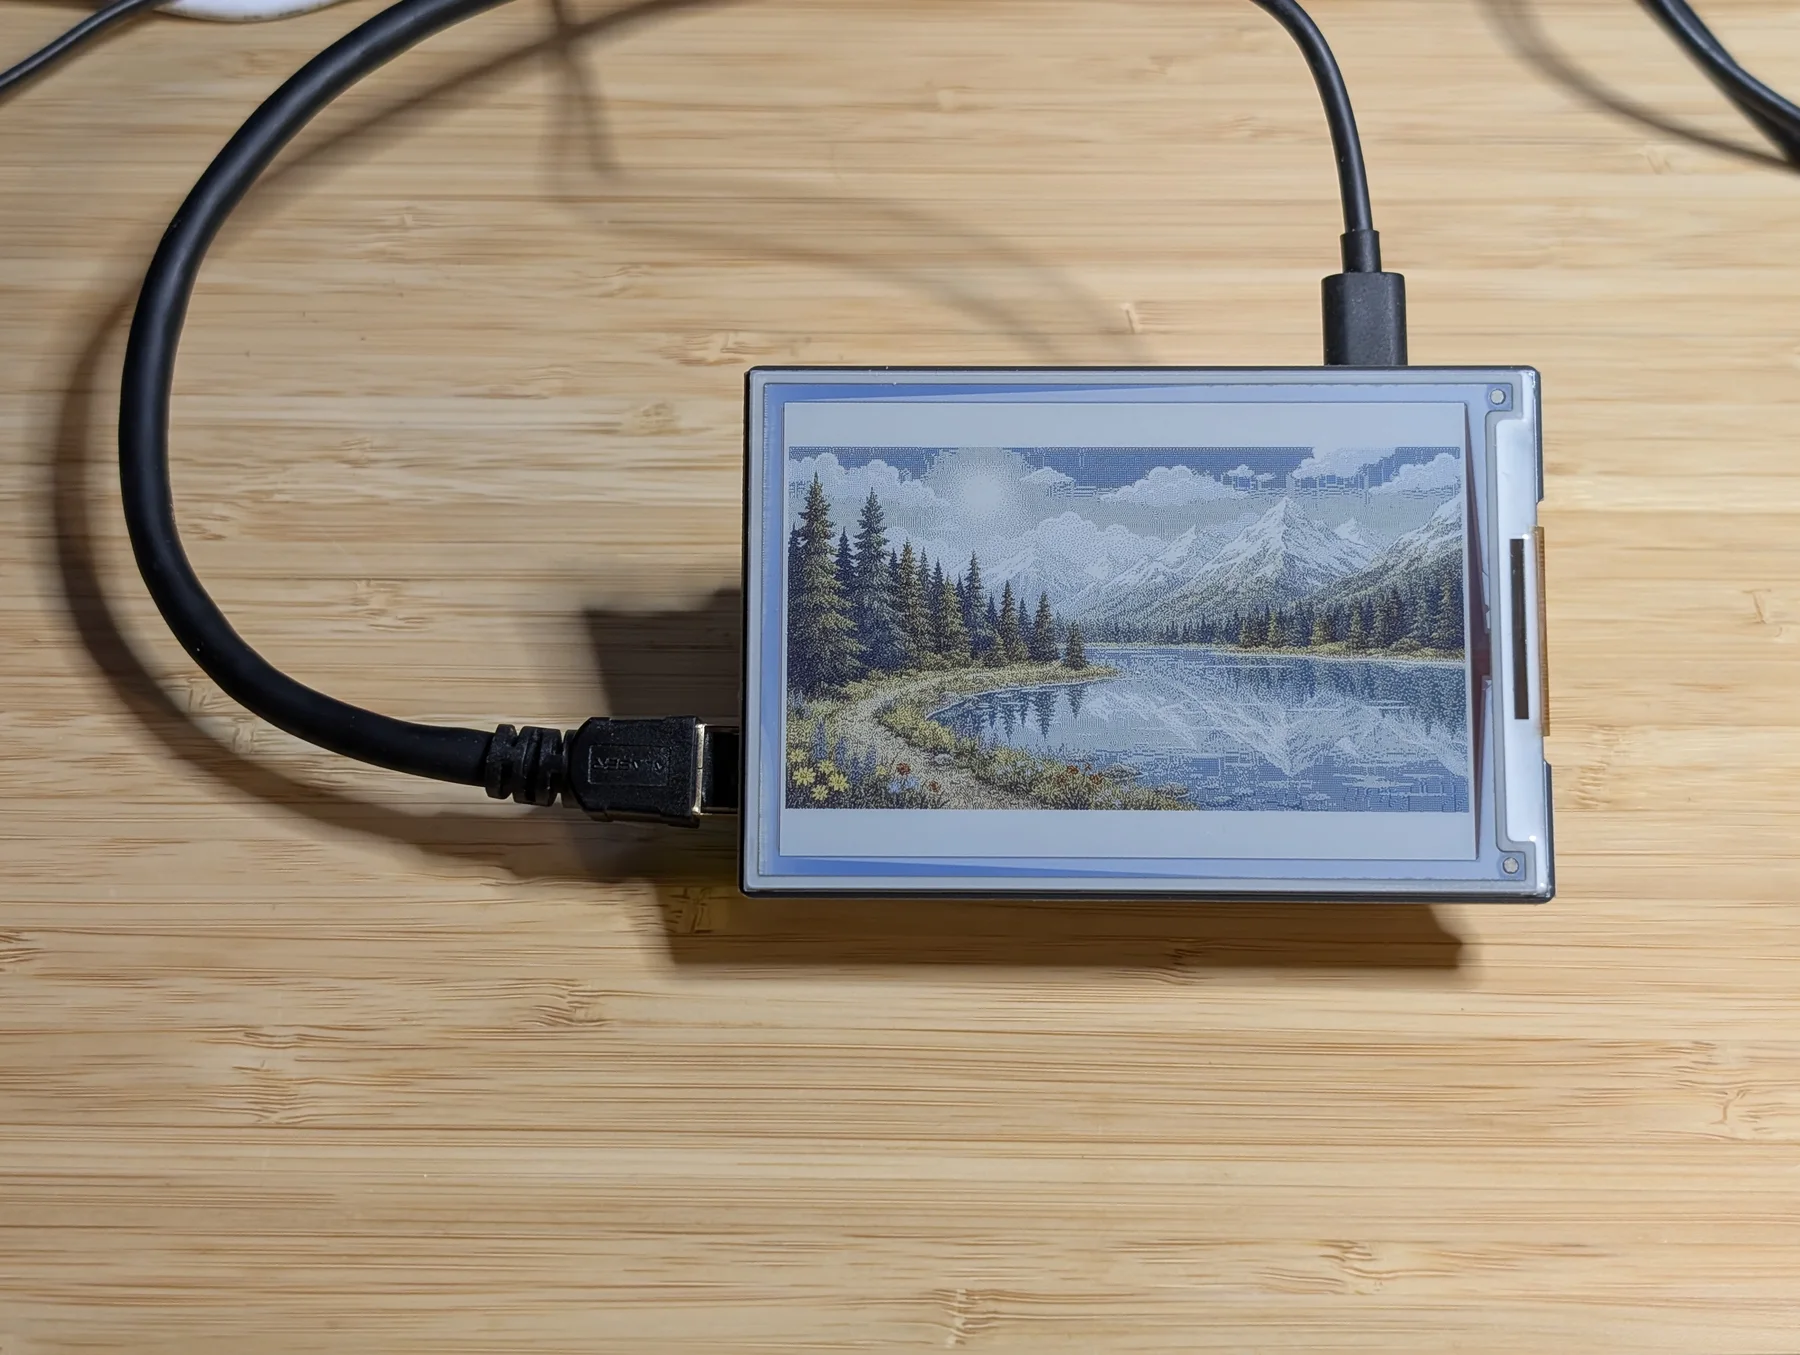
Six-colour serpentine Floyd–Steinberg. The physical display and its surroundings provide the scale that a pixel crop removes.
The six-colour landscape above is not an RGB reproduction, but it is clearly a landscape with sky, mountains, forest, water, reflections, and small warm-coloured details. At its intended size it reads as a complete image rather than as a collection of quantisation errors.
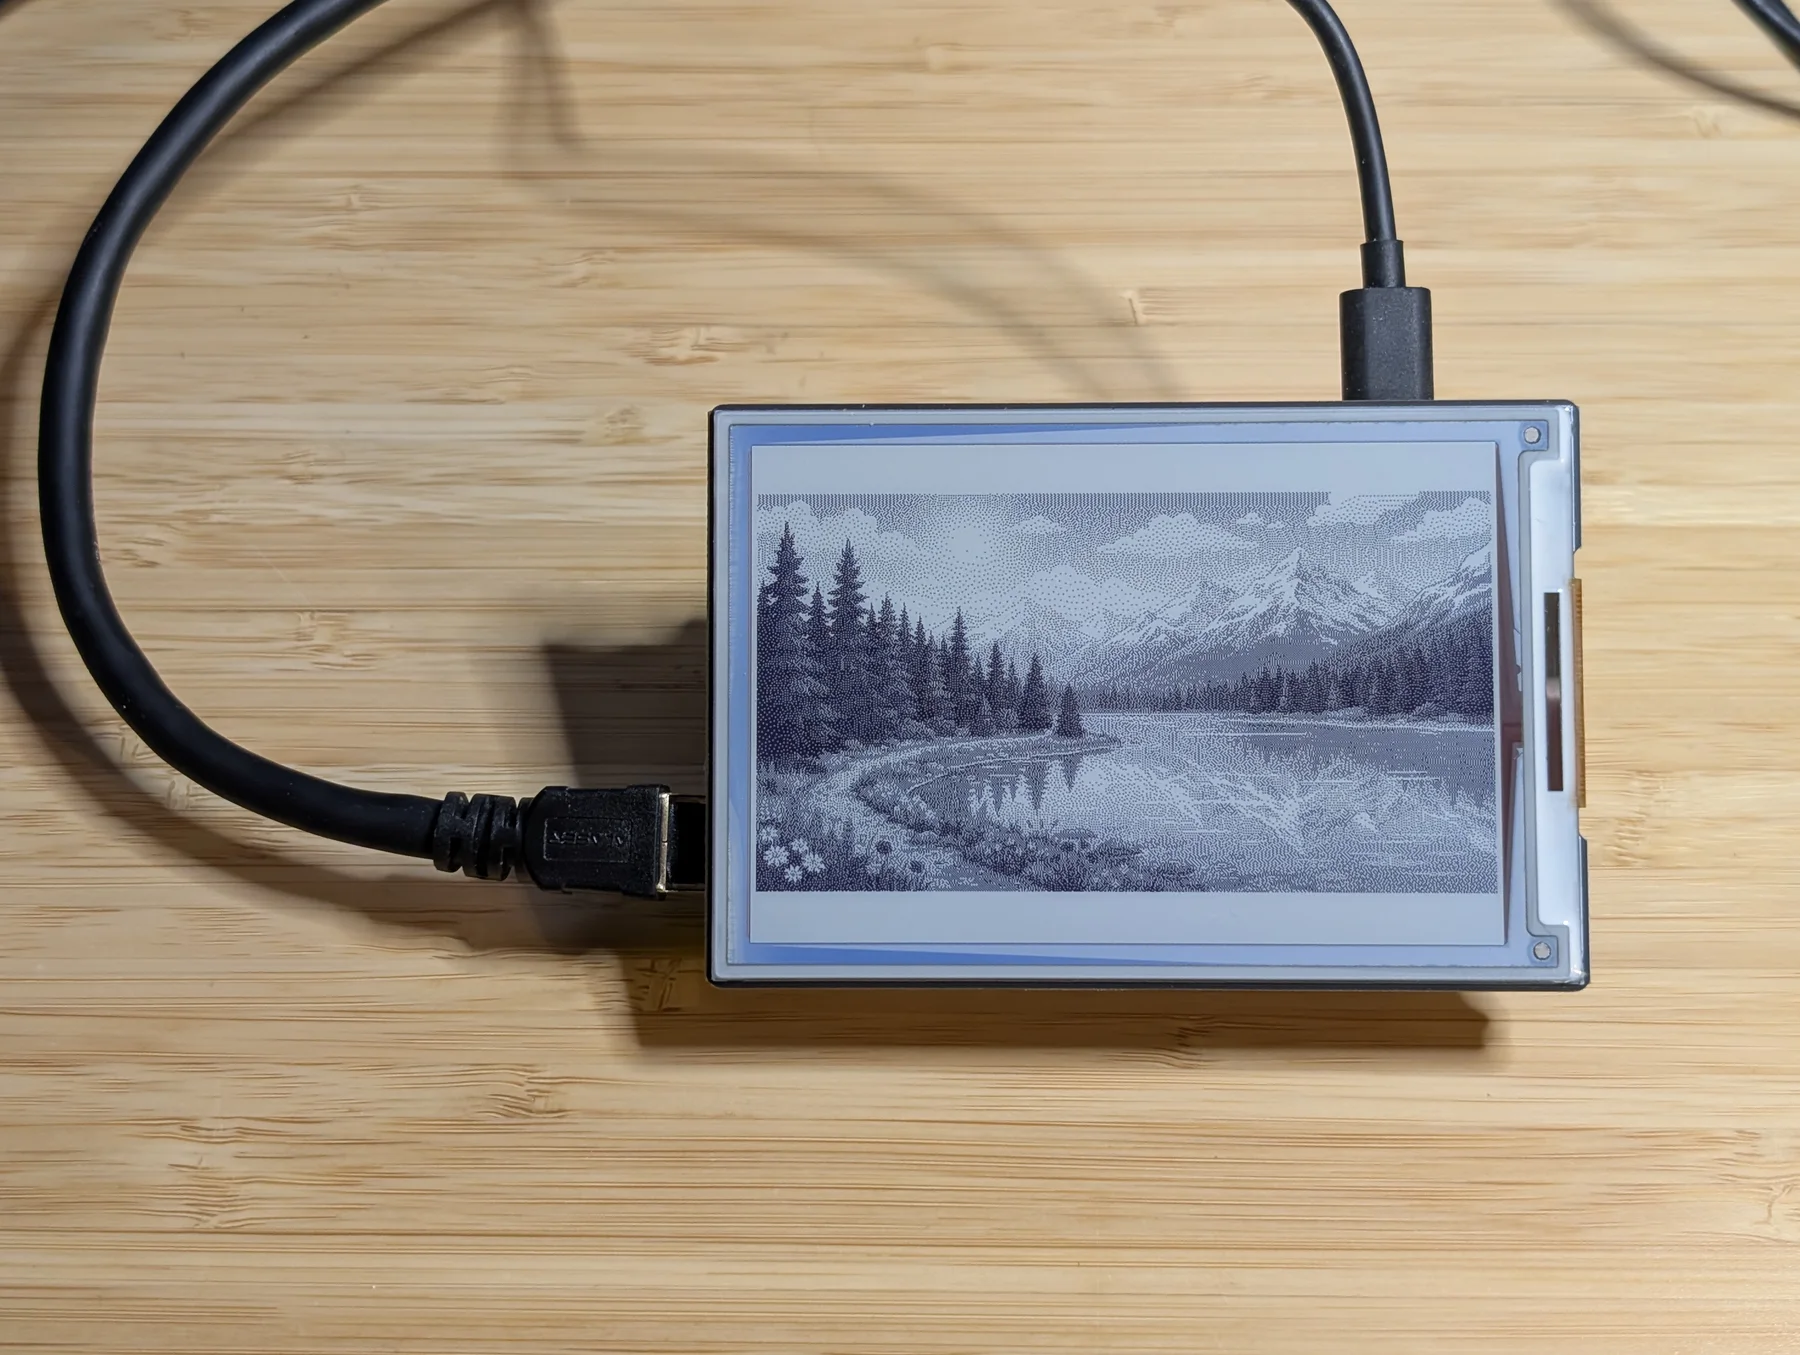
The same kind of scene restricted to two colours. Here the limitation becomes a deliberate graphic style.
The two-colour version goes further. It gives up colour reproduction entirely, yet the mountain silhouette, trees, shoreline, clouds, and reflections remain legible. The result resembles an engraving or monochrome print. That may be unsuitable when colour accuracy is the purpose, but it can be exactly right for an illustration, changing artwork, ambient display, or low-power sign.
The pixel-level comparisons remain valuable: they explain why the methods differ and help select a renderer. They should not be the final judgement. The final output is the physical display, viewed from the distance and in the lighting for which it is intended. From that perspective, six colours are not necessarily too few for a photograph—and even two colours can be enough for an image with character.
Archive
All Posts
7 total
- Displaying Photographs on a Six-Colour E-Paper Screen
Comparing dithering, ordered screening, and AM and FM raster techniques on a 600×400 Waveshare Spectra 6 display driven by a Raspberry Pi 4B.
- Building a PoE E-Paper Temperature and Humidity Monitor
Combining an isolated ESP32 PoE board, an SHT40 temperature and humidity sensor, an e-paper display, and a custom 3D-printed enclosure.
- Building a Resilient, Local-First Sensor Network
How a local-first sensor network keeps collecting through internet outages, synchronizes every minute, processes history centrally, and publishes safely through Cloudflare.
- Controlling Raspberry Pi 500+ RGB Keyboard Lights
Using Python to control individual Raspberry Pi 500+ keyboard LEDs for visual effects and functional notifications.
- Indoor Temperature and Humidity Sensors
Building compact wired and wireless sensors for monitoring indoor temperature and humidity.
- 3D-Printed 19-Inch Network Panel
Integrating several compact switches into a 19-inch rack panel.
- Crystal Adventures
A Blender short-film experiment combining crystal materials, a fluid-simulated waterfall, volumetric lighting, smoke effects, and a 3D-printed crystal light.